Today is going to get a bit specific and technical. But don't worry, this won't be the new standard content here. The following might be interesting for anyone who deals with photography on a daily basis and wants to know how things work under the hood. If you also happen to shoot "at the limits" like me - meaning infrared or ultraviolet - or if you use a manually modified camera, then this stuff might be even more relevant.
Still here? Okay. Let's get started.
In my last post, I described where standard RAW developers like Lightroom hit their limits when it comes to infrared photography. The takeaway was that automated processes optimized for normal photography get completely thrown off by the quirks of an IR image.
The first step of any image processing is what we call demosaicing. Even if you shoot straight to JPEG, this step still happens first, just directly inside the camera instead.
What is demosaicing anyway? The art of puzzling
A RAW file is not a finished image. You have to imagine it more like an incomplete mosaic. Every pixel on the camera sensor sits under a color filter - usually Red, Green, or Blue (the so-called Bayer filter). So a pixel under a red filter only knows the brightness value for red, and has absolutely no clue about green or blue. Demosaicing is the process where the software solves this puzzle. The algorithm looks at a pixel and its neighbors, then makes an educated guess to calculate the missing color values for every single pixel. Only after that do we get an actual color image.
How the software solves this puzzle depends on the motif, the situation, and the camera. It is less of a fixed mathematical equation and more of a strategic choice. This is where the wheat gets separated from the chaff. There are a bunch of different ways to solve this problem, and since most people want to deal with photos rather than algorithms, programs like RawTherapee have smart processes to choose for us. But they also let us make the choice ourselves - which can actually be better, since we as photographers usually know best what we want to focus on.
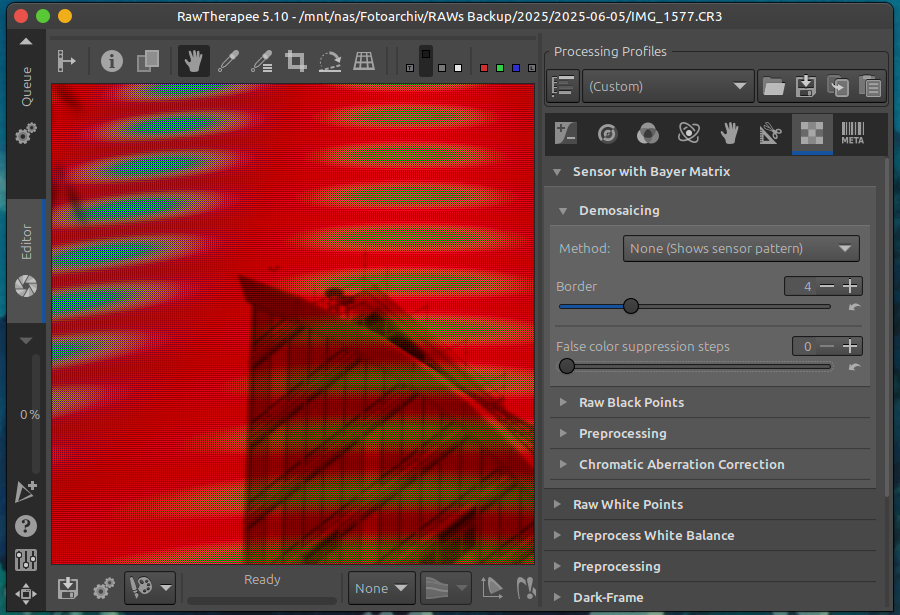
Here is a screenshot from RawTherapee showing a 100% crop of one of my RAW images with demosaicing deactivated. You can clearly see the structure of the sensor:
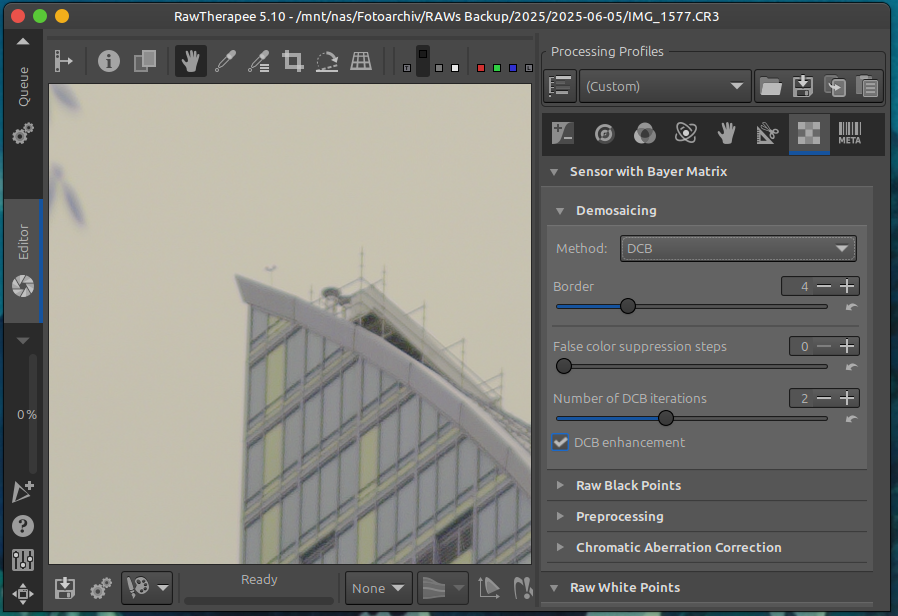
The exact same image, same crop. Only difference: the algorithm.
Broadly speaking, you can divide most algorithms into two philosophies:
1. The "detail-first" philosophy (The Optimists)
These algorithms assume that the image data is clean and that even the tiniest deviation between pixels represents a real detail. They analyze edges and patterns aggressively to reconstruct the sharpest possible image.
- Examples of these algorithms:
AMaZE,RCD,DCB - Strengths: They deliver perfect sharpness with clean, low-ISO images. Ideal for fabrics, architecture, or fine structures.
- Weaknesses: They are easily fooled. Noise looks like a fine pattern to them - and gets promptly "amplified". This leads to things called labyrinth artifacts. You can get false colors (color fringing) on hard edges, or moiré (rainbow patterns) on fine textures.
2. The "artifact-avoidance" philosophy (The Cautious)
These algorithms are more conservative. Their main goal is to avoid making mistakes, even if that means losing a tiny bit of sharpness. They assume the data might be noisy and put more value on smooth surfaces and clean colors.
- Examples:
LMMSE,IGV,VNG4 - Strengths: They are ideal for high-ISO images or noisy data. Labyrinth artifacts or moiré are barely an issue here.
- Weaknesses: With an absolutely perfect image, they can look a bit "softer" in a direct comparison with their aggressive colleagues.
Useful parameters to know
Besides choosing the algorithm, there are a few sliders you can use to fine-tune your strategy. The following refers to RawTherapee, but you can find similar options in other tools too.
- Dual Demosaic (e.g.,
AMaZE+VNG4): A brilliant hybrid approach. You can use a "detail algorithm" for the sharp areas of the image and a "cautious algorithm" for the smooth surfaces (like the sky). Thecontrast thresholdslider defines where that boundary lies. - False Color Suppression: This tool applies a filter that affects only the color information, not the sharpness. It smooths out those colorful splotches that often appear along edges.
- Border: The pixels at the very edge of the sensor can't be perfectly reconstructed because they lack neighbors. Normally, RAW converters just crop them out. With this slider, you can force the software to try anyway - but at your own risk, as this can create artifacts.
With this knowledge, we can now choose the right strategy for our images on purpose. For standard shots, modern RAW developers are already pretty good at doing this for us. Low ISO shot? => AMaZE. High ISO? One of the others... For photographers, knowing this stuff becomes valuable when you deviate from the standard case. Shot at high ISO by accident? A special light spectrum or heavy filter use that creates a scenario the software can't guess? Choosing the algorithm yourself can really help!
One such scenario is infrared photography, so here is an explanation of what that looks like in practice.
Filter Group 1: "Super Color" / Low Wavelength (550nm, 585nm, 625nm)
- The Challenge: Here, a wild mix of strong infrared light and a portion of the visible spectrum hits the sensor. The result is very intense false colors and a high risk of artifacts. However, we still have usable detail information across several channels.
- The Strategy: We need a compromise. A "detail-first" algorithm is good, but it has to keep false colors under control.
- The Choice: I almost always start with
DCBhere. It's just as sharp asAMaZE, but it's better at handling false colors, especially for cameras without an AA filter (like my RP). An alternative is aDual Demosaicapproach to treat the sky and foliage separately. To help things along, I set the false color suppression slider to 2 or 3.
Filter Group 2: "Classic IR" / Mid Wavelength (720nm)
- The Challenge: The signal is now almost pure infrared. A little known fact: the filters on the bayer array become almost transparent above 700nm, so signal strength is distributed across the board. If you choose to watch for color, which technically you still can at this wavelength, your challenge is that color and noise are hard to distinguish.
- The Strategy: At this wavelength you are at a crossroads: You can treat your image like a black&white shot. In that case read the next section. If you prefer a classic color treatment then we have to force the software to treat the image like a high-ISO shot. An "artifact-avoidance" strategy is mandatory so we don't interpret and amplify the noise as detail.
- The Choice: For false-color images,
LMMSEorIGVare the top choices here. They handle the noisy channels gently and prevent those dreaded labyrinth patterns. With a 720nm filter, though, you might also just decide to go straight to a black-and-white conversion. Which brings us to our next option...
Filter Group 3: "Deep IR" / High Wavelength (850nm) & Black-and-White Conversion
- The Challenge: There is virtually no color information left here. The G and B channels are practically transparent to light of this wavelength. Traditional demosaicing would be pointless and counterproductive here.
- The Strategy: If you have access to specialized RAW converters such as RAWTherapee then you can pick a spezielized demosaicing algorithm: "Mono".
- The Choice:
Monois the "anti-demosaicer". It does not attempt a classic color reconstructions but focuses on luminancy entirely. The result is the maximum possible sharpness and tonality without any interference. - A word of warning: If you attempt this with an 720nm filter it depends largely on your setup what you get. Many sensors will produce a sensor grid without demosaicing as some of the color information makes it through. Take a look at the sky, this is where you see this effect best.
So, that's it for today. At some point, I'll extend this series to cover file formats and color spaces, but that's enough for now. Ultimately, for the pragmatic case, you can always just switch your camera to "Sport" mode and trust the tech 😉
Comments
Replies come from Mastodon. Reply on Mastodon to join in.